
Grinding coffee beans is essential for achieving maximum flavor and aroma in your brew. However, not everyone has access to commercial coffee grinders. This guide presents practical techniques for business owners on how to grind coffee beans without a grinder. Each method emphasizes the importance of achieving the right grind size for various brewing methods, ensuring the freshest coffee experience. Through chapters focusing on different grinding techniques using household items, we will equip you with the knowledge to serve quality coffee, improving customer satisfaction and driving your business forward.
Rolling Pin Alchemy: Grinding Fresh Coffee Without a Grinder for Peak Flavor
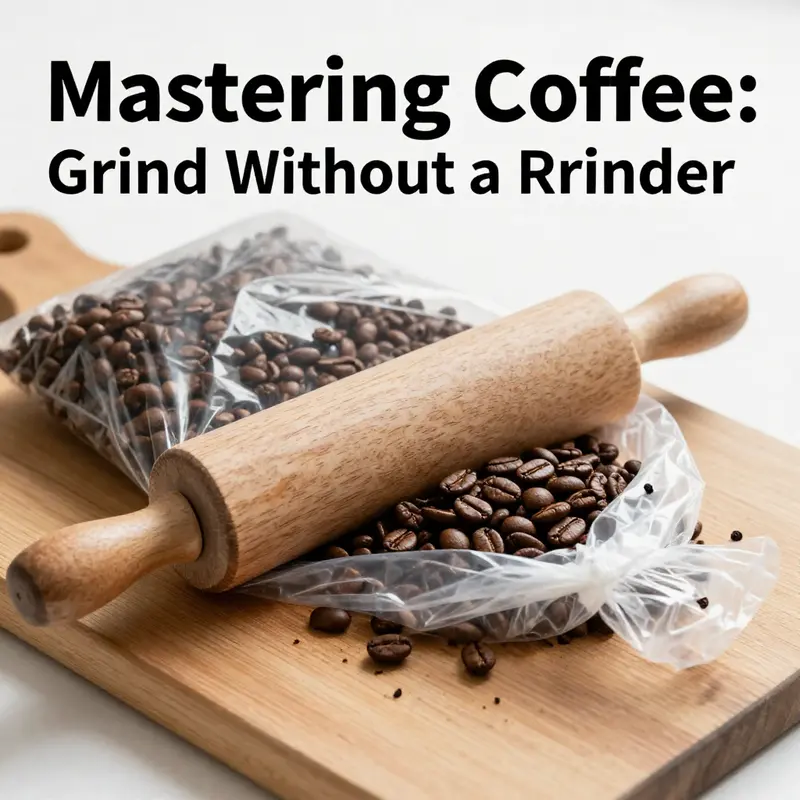
The moment you grind coffee beans, you begin a brief, decisive transformation. The hard, glossy beans suddenly release oils and aromatic compounds as they break apart. When a dedicated grinder isn’t available, you can still unlock that bright, nuanced character with nothing more exotic than a rolling pin and a sturdy plastic bag. This approach is not about perfection of uniformity; it is about practical consistency and the art of timing. The essence of the rolling pin method lies in controlling pressure, mass, and surface contact. It’s a tactile ritual that puts you in close contact with the coffee as it becomes grounds: a memory you’ll taste in the cup, fresh and vivid, especially when you favor short intervals between grinding and brewing. The technique invites a quiet mindfulness that can actually deepen the brewing experience, turning a makeshift setup into a small craft project rather than a chore. And while it won’t produce the razor-fine uniformity of a high-end burr grinder, it can yield a satisfactory grind for most common methods, particularly pour-over and classic drip, where medium-fine grounds bloom and settle in a clean, balanced extraction. The real payoff is freshness. Ground coffee oxidizes quickly, and even the best flavor notes begin to fade within minutes of grinding. The closest you can get to truly like-new flavors is to grind right before you brew. When you do, you’re preserving brightness, acidity, and those fruity or chocolatey undertones that can otherwise dull with time. It’s a small, practical commitment with outsized flavor rewards, especially if you’re patient about the process and methodical about the results. The rolling pin method, in particular, emerges as a straightforward way to translate a handful of kitchen tools into a reliable grind, without the noise, heat, or expense of a traditional grinder. It rewards consistency of technique more than brute force. The approach is well suited to a pour-over or a classic drip system, where a medium-fine grind mirrors the way water should meet coffee: with even, steady contact that allows for a clean, controlled extraction. In a broader sense, this method speaks to a larger truth about home coffee: you don’t need perfect equipment to brew well. Good technique, thoughtful timing, and respect for freshness can compensate for less-than-perfect gear. The rolling pin technique is not a universal panacea; it does have limits. The grind you produce may lack the razor-edged uniformity that a burr grinder reliably delivers, and some batches will exhibit a slightly coarser or finer variance. That’s okay if you adapt your grind to your brewing method. For pour-over, for instance, a medium-fine texture that resembles coarse sand will help with even extraction; for a drip brew, a similar texture can produce a balanced cup with pleasing clarity. If you’re aiming for a French press, you’ll naturally lean toward a coarser texture, but the rolling technique’s inherent variability makes it a touch more challenging to hit a precise coarseness. It’s a reminder that the grinder is not the sole determinant of flavor; the way you treat the beans, the timing of the grind, and the care you take to avoid overheating matter just as much. The rolling pin method begins with the simplest possible setup: a thick, sealable plastic bag, a rolling pin, and a measured handful of beans. The bag is an essential partner in this process. It cushions the impact and concentrates the force you apply with the pin. Using a double-zip bag is a small but meaningful improvement; the extra resilience reduces the risk of tears as you press and roll. The quantity is deliberate too. Around 30 to 50 grams of beans fits comfortably in a typical bag, enough to brew a couple of cups without sacrificing control. Laying the bag flat on a sturdy surface creates the kind of stable workspace that makes the rolling movement fluid rather than wobbly. When you seal the bag, the goal is to squeeze out as much air as possible. A vacuum-like environment lowers the risk of the beans scattering or the bag slipping during the rolling. Then the rolling begins in earnest. Start with firm, even pressure as you roll the pin back and forth across the bag’s surface. The first stage crushes the beans into coarse fragments, a crucial precondition for efficient grinding without heat buildup. As the fragments become smaller, switch to a side-to-side rolling motion. This variation distributes pressure more evenly and helps reduce large chunks that would clog a pour-over filter or cause uneven extraction. The process progresses until the bag’s contents resemble coarse sand—enough to offer a respectful surface area for extraction without becoming powdery dust. Optional but often helpful is a quick sift through a fine mesh sieve. A brief pass to remove any large pieces can save you from under-extraction later, and any larger fragments can be reintroduced to the bag for another pass. The practical reality is that the rolling pin method will rarely rival the uniformity produced by a purpose-built grinder. Yet it is a legitimate, accessible path to fresh grounds, especially when you’re brewing with methods that tolerate a little variance. You’ll likely notice a broader distribution of particle sizes than a burr grind would yield. That’s not a defect; it’s a trade-off you accept to preserve aroma and flavor in the absence of specialized equipment. If you want to maximize your chances of consistent results, there are a few guidance points that help. First, maintain a stable, flat surface. A cutting board on a sturdy counter top is ideal. Any wobble translates into inconsistent pressure and inconsistent grind sizes. Second, apply deliberate, measured pressure. It’s tempting to press harder for speed, but that extra force causes more heat buildup in the bag and can slightly scorch the beans’ oils, blunting aroma. Slow, controlled rolling yields better nano-adjustments to grind size and reduces the risk of overheating. Third, mind the contact area. A rolling pin with a broad surface distributes pressure more evenly across the bean mass than a narrow tool. If you have a heavier rolling pin or even a wine bottle on hand, use it—larger contact area means you can achieve the target texture more quickly and with less fatigue. Fourth, when you’re happy with the texture, transfer the grounds promptly to your brewing vessel. Ground coffee begins to lose aroma as soon as it’s exposed to air. If your plan is to brew in just a few minutes, you’re still in prime flavor territory; if you wait longer, you’ll start to see a noticeable decline in brightness and complexity. The rolling pin method is a practical bridge between the luxury of a proper grinder and the reality of a minimal toolkit. Its strengths include speed in the moment and a surprisingly consistent output given the right approach. Its limitations, frankly, are part of the trade-off: the volatility of particle size and the absence of a regulated grind setting. Those realities are worth acknowledging, but they don’t negate the method’s value. It’s a viable option for many home setups, especially when you’re excited to drink coffee promptly after waking, or when you want to avoid grinding too far in advance. The technique invites a tactile engagement with the beans that can be almost meditative. It becomes less about mechanical precision and more about learning to feel the grind’s progression through your hands and the bag’s resistance. This sensory feedback is not purely anecdotal; it translates into practical adjustments. If you notice a cup that’s under-extracted with sour notes, you may be dealing with too coarse a grind or uneven chunkiness. A second pass with a longer, more deliberate rolling session can lower the unevenness of the grind and bring better balance to the cup. If, on the other hand, the brew tastes flat or lacks brightness, a next attempt might press a touch more firmly to break down larger fragments or shorten the distance between the rolling sessions to reduce oxidation. Either way, the process is iterative, not static. It rewards calm focus and a willingness to adjust on the fly, which is a rare but valuable skill for home brewers who don’t own a grinder. A final consideration concerns the broader idea of grind size. Even though the bag-and-rolling method tends to produce a texture closer to medium-fine for pour-over, the same approach can be tuned toward coarser or finer textures by varying how long and how forcefully you roll. The same method can also introduce a longer-term habit of thinking in terms of how the grind will meet the water in your specific brewing method. If you’re aiming for a pour-over or a Chemex, maintaining a texture somewhere in the middle of medium-fine will support a steady, even extraction. If you’re leaning toward a French press, you’ll want a coarser texture, perhaps achieved by lighter passes and fewer cycles, avoiding fines that might pass through the mesh and muddy the cup. In a broader sense, this approach echoes an important principle of coffee making: freshness beats automation. No matter the device—or its absence—the quality of your cup rests on the speed with which you pass from bean to brew. The sooner you grind after purchasing beans, the more you preserve the essential oils and aromatic notes that define a coffee’s personality. Even the most precise method cannot resurrect flavors that have already oxidized beyond a certain threshold. This is why the rolling pin method has its strongest justification when you’re working with fresh beans and a straightforward brewing plan that suits a medium-fine grind. The practical takeaway is simple. If you’re exploring alternatives to an electric burr grinder, this technique is worth keeping in your repertoire. It gives you legitimate control over texture, it minimizes heat transfer, and it scales with your equipment and your time. You’ll likely discover that your best results come from a calm, measured sequence: weigh or measure your beans, prepare your bag properly, roll with intention, check the grind’s texture, and then brew with clean water at the right temperature. You’ll also discover that the process has a way of changing your relationship with coffee. It invites a slower, more thoughtful approach that honors the bean’s journey from forest to cup. And because the method hinges on close-to-brew timing, it creates a natural rhythm: grind, brew, taste, adjust, and repeat with greater confidence each day. For readers who want to explore further nuance beyond the rolling pin approach, the broader landscape of DIY grinding methods provides helpful context. Mortar and pestle, for instance, can yield a more uniform coarse grind when a smoother surface and stonework allow for a slower, more deliberate crush. A mortar and pestle tends to impart a calmer texture and can avoid introducing heat as readily as some metal tools. It’s ideal for a coarse grind tailored to a French press. A high-speed blender or a dry-blade food processor offers speed when you’re in a hurry and small quantities. Short pulses, brief rests, and careful monitoring of heat are essential to preserving aroma when you use these appliances. When you consider all the options, you can see that the core principle remains the same: ground coffee should smell immediately vibrant, and that aroma should reach your nose just as you begin to sense the cup’s aroma blooming in the cup. The rolling pin method preserves aroma by cutting the oxidation window short and by limiting exposure to heat that can be generated by longer grinding sessions in a blender or processor. That is the practical beauty of this technique—it’s humble, accessible, and capable of delivering a bright, balanced cup if you respect the basics: fresh beans, minimal oxidation, and a brewing method that aligns with the grind you’ve produced. In closing, recognize that the rolling pin and plastic bag method is not a miracle cure for coffee flavor. It’s a testament to practical ingenuity. It shows how a few simple tools can unlock a quality cup when you’re without a grinder. It aligns with the broader truth that coffee excellence is rarely about one piece of gear; it’s about a sustained attention to the bean’s journey—the harvest, the roast, the moment of grind, and the moment of water meeting coffee. When you treat each step with care, even a makeshift grind can yield a cup that tells a story of freshness and intention rather than compromise. And if you’re ever tempted to dive deeper into alternative grinding methods, there is a concise body of guidance that can illuminate the relative strengths of each path, including how to maximize flavor with minimal equipment. For a deeper dive into the broader landscape of rolling pin methods and related DIY approaches, you can consult an accessible resource that has explored these techniques in depth. External reference: https://www.seriouseats.com/rolling-pin-coffee-grind-method
Ritual Precision: Mastering Fresh Coffee Ground by Hand with a Mortar and Pestle

Begin with a deliberately small batch, which is the quiet cornerstone of consistency when using a mortar and pestle. Start with five to ten beans, enough to feel the resistance, enough to learn the pace that works for your particular mortar’s weight and the pestle’s grip. The goal is to avoid scattering beans and to gain a sense of the density you’re grinding through with each press and roll. A granite or dense stone mortar is ideal because it can withstand the pressure needed to crack and crush without chipping, and its surface delivers just enough friction to coax the oils free without overheating them. If you only have a ceramic or less substantial mortar, proceed with even more care and in even smaller batches. The idea is to work with a tool that remains cool to the touch as you grind, because heat is a subtle but real thief of aroma and flavor. As the beans yield to pressure, you’ll hear a soft crack and feel a change in resistance. This audible cue is your first, essential feedback: you are transitioning from whole bean to fragments and eventually to a more uniform texture.
Crushing is not merely a single action but a sequence—a rolling, pressing, and rotating dance that breaks beans into pieces and then coaxes those pieces toward a more consistent size. Hold the pestle firmly and position it at a slight angle to the beans. Apply steady downward pressure while you rotate the pestle over the bean bed, as if you were trying to coax the beans into a tiny, granular terrain. A gentle rolling motion helps to fold in newly crushed fragments with those that have already been processed, creating an even bed rather than a pile where some pieces stay coarse and others become powdery. The first phase should produce coarse fragments that resemble small pebbles; this is your signal to pause and assess.
To advance toward a more nuanced grind—one that suits more delicate brewing methods—you’ll shift to a more methodical approach: continue the same rolling and pressing, but let the pestle trace a broader arc over the mortar’s interior. As you gain confidence, gradually increase the distance of your rolls, letting the pestle skim across the surface with longer paths. This extended motion helps break down larger fragments and reduces the likelihood of uneven particle sizes that can lead to uneven extraction. If you notice that fragments are sticking to the mortar, pause and scrape with the pestle’s edge to redistribute them. A clean, even bed of grounds yields more uniform extraction and a better cup.
As the grind progresses, you’ll decide how far to push toward finer textures. For many brew methods, a medium-fine texture—somewhere between coarse sand and fine sugar—works well. This is particularly true for pour-over styles, where a clean, consistent flow through the filter benefits from uniform particle size. If your aim is a stronger, more intense drink reminiscent of espresso, you’ll require a finer powder, which can be challenging to achieve evenly with a mortar. In practice, you’ll perform several short grinding cycles rather than one long session. After each cycle—say, a minute of steady grinding—pause, breathe, and evaluate the texture by feel. Rub a pinch between your fingers; you should sense a mix of small fragments and a few larger pieces. If the mixture feels uniformly gritty and sandy, you’re likely in a good zone for a pour-over. If it feels dusty and powdery, you may be approaching a texture more suitable for an espresso approach, which the traditional hand method can approximate with significant time and patience.
One often overlooked factor in hand grinding is the role of heat. Friction from the pestle and the motion of grinding generates warmth, which can awaken aroma but also risks beginning the oxidation process sooner than desired. The aromatic oils released during grinding contribute to the cup’s aromatic profile, but excessive heat can turn the experience toward flat or hurried flavors. To balance this, work with short, deliberate bursts rather than a continuous, tireless push. If the pestle starts to feel warm in your hand, pause and let it cool briefly before continuing. You may even set the mortar down for a moment to allow the room’s air to carry away some of the built-up heat. The key is to maintain a regime that preserves aroma while still advancing the grind toward the target texture.
A practical rhythm emerges with experience. After a short initial crush, you’ll often find it helpful to switch to a circular, back-and-forth motion that covers the entire surface of the bed. This method ensures that every bean fragment meets the same pressure and earns its share of the friction. In a few minutes, you’ll witness a transformation: whole beans become broken bits, then larger fragments, and finally a distribution where the finer particles are just starting to emerge. At this moment, and only at this moment, you can consider finishing the grind for a pour-over or similar method. Sift the resulting grounds through a fine mesh if available in order to catch any unusually large fragments that would disrupt the brew’s flow. Regrind those pieces briefly to maintain a uniform particle distribution.
The patience you invest in this process has a direct payoff in flavor. The friction-induced heat—carefully moderated—offers a delicate boost to the aromatic compounds that define a coffee’s character. Yet the same heat, if allowed to accumulate too long, can accelerate the oils’ deterioration. Those oils are the very essence of aroma and body, and their integrity benefits from being liberated in a controlled microcosm near the moment of brew. This is why some practitioners who grind by hand treat the ritual as a countdown to brewing rather than a race to a finer powder. The time you invest is a small price for the larger payoff: a cup with brightness, a nuanced sip of beans that carries the story of their roast and origin into your cup.
As you near the end of your hand-ground session, you should assess the texture by sight and touch. The target for many pour-over setups is a grind that resembles gritty sand—each particle distinct but not chunky. If you tilt the mortar and see many larger shards, there is more grinding to do. If the texture resembles a coarse flour, with no sharp edges and a uniform feel, you’re near the finish line. The most practical method for judging consistency, without an industrial assay, is tactile and visual: rub a small amount between your thumb and forefinger, then inspect the grains’ size distribution. A well-ground batch will present a consistent feel across the bed and a uniform color indicating even milling. If you’re preparing multiple brew sessions in a day, you might ground in stages to maintain a fresh profile for each cup rather than letting a single batch sit and oxidize.
Cleaning the tool after grinding is not merely hygienic; it preserves the integrity of future batches. Immediately rinse the mortar and pestle with warm water to remove oils and tiny particles. Gently brush away residues from the mortar’s interior and dry thoroughly before storing. Coffee oils can become rancid if left to linger, and a light odor from previous batches can subtly influence subsequent grinds. The ritual of cleaning reinforces the respect you give the tool and the beans, turning it into a practice rather than a chore.
The payoff for embracing this method extends beyond flavor. Grinding by hand invites you into a closer relationship with your coffee’s journey—from bean to cup. Freshly ground beans retain more aroma, and the act of breaking them in real time preserves a connection to roast level, origin, and freshness that machine grinding can only approximate when the grinder and coffee are far apart in time and space. It also democratizes the experience: you do not need a contraption with a motor or a specialized device to participate in the process. A simple, well-chosen mortar and pestle, paired with a calm, methodical approach, can yield results that stand up to a more elaborate setup. The ritual’s slower tempo invites mindful tasting, which often reveals subtleties that rush-hour methods may veil.
These moments of contemplation during grinding can also influence how you prepare the coffee after grinding. If you know you will brew using pour-over, you might favor a medium-fine texture that allows a gentle, controlled extraction. If you intend to press the coffee, a coarser texture can help avoid over-extraction and muddy cups. The balance is delicate and personal; it invites you to tailor particle size to your palate and to the particulars of your beans. Because this method requires you to adapt to the beans’ roast level, age, and moisture, you learn to read the minute differences in each batch as you grind. The more you practice, the more intuitive your adjustments become, and the more you begin to anticipate how a certain roast or origin will behave when exposed to warm water and time in your chosen brew method.
In the end, the mortar-and-pestle technique is less about achieving laboratory perfection and more about cultivating a relationship with your own coffee. It requires patience, attention, and a willingness to embrace a slower, more tactile form of craftsmanship. The resulting cup often tastes more alive, with aromas that bloom in the cup, not just in the air above it. The approach aligns with a broader philosophy of coffee that values freshness, control, and the sensory rewards of close attention to the moment of grind. For those who relish the idea of a quiet, hands-on morning ritual, this method offers a meaningful path from bean to brew that remains surprisingly approachable in a world of high-tech gadgets.
If you wish to explore further, you can find additional guidance that expands on these same principles and offers more nuanced tips for refining the texture and handling heat. This external resource provides a broader perspective on grinding coffee beans by hand and complements the techniques described here, helping you master a practice that stays with you through many mornings and many cups of coffee. https://www.thespruceeats.com/grind-coffee-beans-without-grinder-1976785
Close-Range Craft: Grinding Coffee Beans Without a Grinder Using a Food Processor or Blender
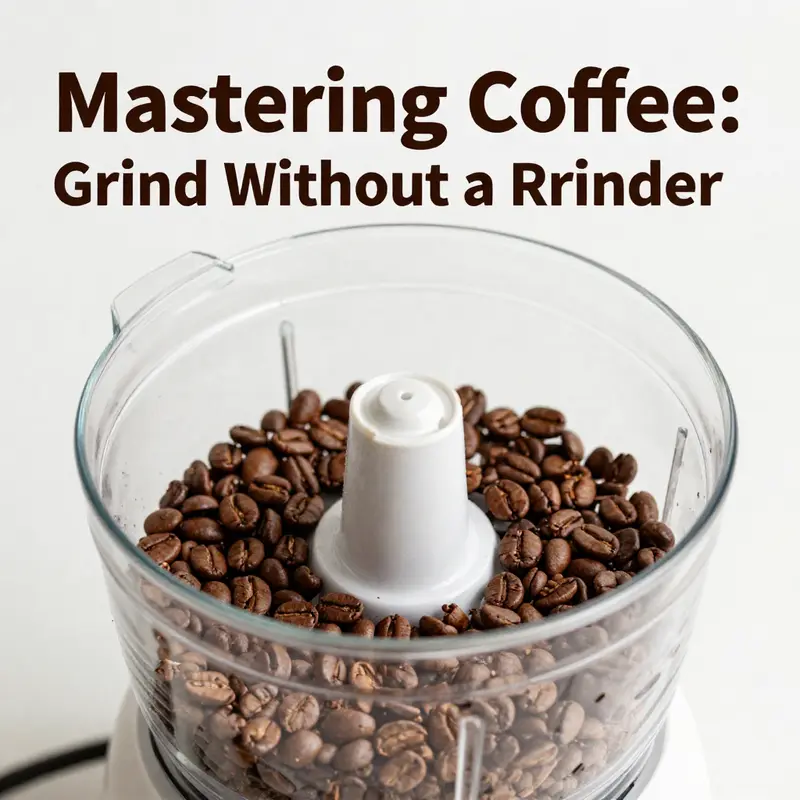
When a burr grinder isn’t in reach, the kitchen can still become a reliable coffee lab. The blender or food processor sits among your familiar appliances, ready to transform whole beans into workable grounds. The idea that blades chop and mix rather than crush evenly can feel uncertain at first, but with a mindful approach, a blender or processor can deliver results that brighten your morning cup without requiring a dedicated device. This chapter follows that practical path, weaving technique with restraint to emphasize flavor preservation, consistency within a batch, and a respectful nod to the moment when the coffee meets hot water. The core challenge is not the absence of grinding gear but the need to coax a stable particle size from a tool that isn’t designed to produce uniform, burr-style grinds. Blades excel at breaking beans apart, not at translating whole beans into evenly sized fragments. Still, with small batches, short pulses, and careful checks, you can approach a workable texture for most home brewing methods, from pour-over to French press, while avoiding the heat buildup that dulls aroma and flavor.
The first and most important distinction to acknowledge is the mechanism at work. A blender or food processor uses fast-spinning blades that shear and chop. A burr grinder, by contrast, crushes and shears with a defined gap between burrs, yielding a more uniform particle distribution. That difference matters for extraction. Fine particles can over-extract quickly and contribute bitterness; coarse particles can under-extract, leaving you with a weak cup. The trick with a blender is to manage these effects rather than erase them. Start with small quantities, stay vigilant about temperature, and accept a degree of variability as part of the process rather than a flaw to be eliminated. In practice, this means embracing the texture you can achieve rather than chasing an ideal that a blade-driven device won’t reliably deliver.
To begin, treat the blender or processor as a precision tool in a limited window rather than a one-size-fits-all solution. The experiments with this method consistently favor coarser textures, which align well with French press and cold brew, or a medium-coarse when you’re aiming for a pour-over experience that still benefits from sufficiently exposed coffee surfaces. The texture you’re aiming for is not a perfectly uniform powder but a consistent, sand-like feel with noticeable small granules and few large shards. The exact texture depends on your brewing method and your patience, yet with practice you’ll recognize a recognizable range of ground sizes that perform reliably in the cup.
Begin with a small batch—about one to two tablespoons of beans. This limit isn’t merely a rule of thumb; it’s a practical safeguard. A larger load overwhelms the blades and makes it harder to monitor the grind’s progress, increasing the likelihood of a mix that leans too fine or too coarse. Place the beans in a dry, clean blender jar or the dry chamber of a food processor. Dry is essential; moisture can clump the grounds and invite uneven extraction. Use the pulse function in short bursts, typically three to five seconds at a time. Continuous running heats the beans and alters their volatile compounds, dulling the aroma you’re striving to preserve. After a few short pulses, pause and assess the texture. If the mixture resembles coarse sand with a few stray chunks, you’re on the right track for pour-over or a standard drip brew; if you see a more powdery, fine surface, you’re drifting toward espresso territory—which you’ll want to manage carefully or reserve for methods that tolerate a broader grind range.
The texture you’re listening for is crucial. For pour-over and Chemex, aim for a medium-fine texture that feels like damp sand with a touch of grit. For a French press, you’ll want coarser granules, almost like crushed cornmeal but with a more irregular surface to aid the plunger’s extraction. If your goal includes an espresso-like shot, understand that the blender approach will rarely match the precision a burr grinder provides. In practice, you can attempt a very fine grind by continuing short pulses and carefully inspecting the outcome, but the variability will be higher, and the risk of over-extraction or clogging will be greater. You’ll learn to judge the difference not by a perfect uniform powder but by the behavior of the grounds in contact with water—the way they weigh on the filter, how the bloom looks when hot water first hits the coffee, and how quickly the aroma rises in the kitchen.
A key factor in achieving this balance is temperature control. The friction from blades generates heat, and warmth accelerates the evaporation of aromatic compounds that define a coffee’s aroma. If you notice warmth beyond the immediate touch of your palm after a batch, pause longer between pulses, or reduce batch size further. Let the beans rest briefly between pulsing cycles. This small cooldown period makes it easier to avoid over-processing and helps maintain a clearer separation between fines and coarser particles. If you’re aiming for a reliable medium grind, you’ll often find that a sequence of short, deliberate pulses, interspersed with small breaks, gives you a more predictable result than a rapid burst of activity.
Texture is just the beginning. The grind’s consistency interacts with water chemistry, heat transfer, and time. You’ll find that even when you achieve a sand-like texture, the finer particles produced by blade action can pass through many standard drippers and distill into a concentration of over-extracted notes if left unchecked. That’s not a condemnation of the method; it’s a reminder of the trade-offs that come with using blades instead of burrs. The upside is that you gain speed and convenience, especially when you’re trying to brew in a kitchen that’s also juggling a busy morning. It’s worth noting that the method shines when you’re flexible about your brew style and patient with experimentation. If you’re new to this approach, keep a small log of batch sizes, pulse durations, and the resulting brew outcomes. Over time you’ll identify a comfortable rhythm and a ground texture that consistently yields a satisfying cup.
As for workflow, the act of grinding with a blender should be integrated with your brewing plan. If your routine centers on pour-over, you’ll likely switch to a medium-fine texture. If French press is your preferred method, you’ll lean toward a coarser grind. If your imagination favors a quick espresso-like practice, you’ll adjust texture toward a fine sand with the acceptance that the results may vary more widely than you’d see with a proper burr system. The goal is not perfection in particle uniformity but a reliable, repeatable texture that matches your chosen brew method closely enough to extract well without spending excessive time or risking flavor degradation from heat.
Another important consideration is oxidation. Ground coffee oxidizes rapidly; exposure to air begins to degrade aroma and flavor within minutes after grinding. When you grind with a blender, you’re effectively exposing more of the coffee to air per minute than a burr grinder would typically expose in the same timeframe. The practical implication is simple: grind as close to brew time as your schedule allows. If a morning rush makes it impractical to grind immediately before brewing, you might prepare a small batch of coarser grounds for the day and keep them in an airtight container away from light and heat. That said, even with a blender, the freshest possible grind will yield the most vibrant cup. If you’re aiming for a particular flavor profile—brighter acidity for a pour-over, fuller body for a French press—let the texture guide the choice of batch size and pulse cadence. The more you align texture with your brew method, the more you’ll notice how the grind becomes a partner to water temperature, pour rate, and bloom time rather than a stubborn obstacle.
A practical, experiential takeaway is to treat the blender as a tool that complements taste rather than a replacement for technique. Cleaning is part of the technique, too. After grinding, empty the jar and rinse it with warm water to remove oils that can linger and alter future grinds. If you skip this step, you risk the next batch inheriting a stale, cross-flavored profile from the previous grinding session. For the same reason, avoid leaving bean fragments in the blade area; residual oils can become rancid over time and skew flavors in unpredictable ways. This attentiveness to cleaning helps you maintain the integrity of your grind, even when the methods behind the grind aren’t as precise as a dedicated grinder.
In practice, you’ll discover that the blender method serves best as a flexible, quick-grind option when you’re working with a handful of beans and a brewing plan that accommodates a slightly uneven grind. It’s an invitation to experiment with texture, timing, and batch size until you discover a rhythm that consistently yields pleasing results. The approach has a gentler learning curve than mastering a complex hand-grinder technique, yet it demands the same respect for timing and fidelity to the chosen brewing method. The value lies in your ability to translate a familiar kitchen tool into a reliable stepping-stone toward a fresh, well-extracted cup.
Finally, consider this perspective: no single method will perfectly mimic a high-end burr grinder. What you gain is accessibility and immediacy. What you accept are trade-offs in uniformity and predictability. If you’re patient and observant, you’ll calibrate your blender-ground coffee to your palate and method, and you’ll be able to prepare a well-constructed cup without a dedicated grinder. The journey isn’t about reproducing a professional-grade grind at home; it’s about widening your options so that great coffee remains within reach even when your gear is minimal. The goal is to empower you to choose a viable path in any given morning, and to honor the bean’s inherent complexity by treating it with care and respect from grind to cup.
For readers who want a deeper, more visual walkthrough of this approach, there are practical guides that explore the mechanics of blade grinding and provide cautions about heat management and texture control. These sources reinforce the idea that a dry-blade technique, used with small batches and short pulses, can produce workable grounds for multiple brewing styles when done thoughtfully. While the blender method might not replace the precision of a burr grinder, it stands as a capable, accessible option for those mornings when time, space, or budget limits flexibility. In the end, it’s about finding a process that feels reliable to you and about respecting the bean enough to grind close to brewing time so that the aroma remains intact and your cup remains vibrant.
External reference for further practical detail: https://www.thespruceeats.com/using-a-blender-to-grind-coffee-beans-4689754
null

null
Final thoughts
In summary, grinding coffee beans without a traditional grinder can be effectively achieved using common household tools. Each method highlighted offers unique benefits tailored to different grind sizes suited for various brewing techniques. By adopting these methods, business owners can maintain a focus on quality and freshness, enhancing their coffee offerings. Remember, the key to great coffee lies not only in the grind but also in maximizing the flavors through careful preparation. Starting today, you can provide your customers with remarkable coffee experiences that will undoubtedly set your business apart.